


Build a Multi-Tenant App With Entity Framework Core & ASP.NET 7 – Free Guide (Part 1)

- Types of Multitenancy
- Building a Simple Multi-Tenant Application
- Tenant Identification Per Request
- Setting Up the Application
- Add Entity Framework
- Create the IMustHaveTenant Interface
- Create the Product Entity
- Create the Tenant Entity
- Create the Product Service
- Inspect the Newly Created Database
- Create Tenant Resolver Middleware
- Create a Current Tenant Service
- Create a TenantDbContext
- Modify ApplicationDbContext Save Changes Override
- Add a Global Query Filter to ApplicationDbContext
- Testing the Multi-Tenant Capabilities of the Application
There is always a point in a software developer’s career where they start to think about building a Software as a Service (SaaS) type platform. A SaaS business model is one where subscribers pay to use the application, each having their own instance, which enables the developer (you) to retire early to a secluded beach in Tahiti and live off the passive income.
The quickest, dirtiest way to achieve this business model from a technical point of view, is to create a separate deployment for each subscriber. This however, is not ideal, because once you have more than a handful of customers, maintaining these separate deployments will quickly turn into a nightmare.
Realistically the only way your dreams of early retirement in the South Pacific will come true is if you implement what’s known as multi-tenant architecture. Multi-tenancy is the concept of having one instance of the application which serves multiple subscribers (tenants), but does so in a way that keeps each tenant’s data completely isolated
In this article, we will look at how we can achieve this type of multi-tenant SaaS architecture with ASP.NET and Entity Framework Core. We will build a simple application step by step. By the end of this tutorial you will understand the fundamentals of how multitenancy works in ASP.NET.
Download the finished version here from GitHub
There’s also a Part 2 of this article where we will extend the functionality of this single-database setup to support a hybrid and multiple database setup
While this article is a great way to understand multi-tenant architecture, it’s definitely tricky to code a secure and well architected final solution with identity. The Nano ASP.NET Boilerplate follows the same fundamentals you will learn here, but adds ASP Identity, clean architecture, and the full gamut of controllers and services you will need to build an app. Instead of spending hours implementing the mundane essentials like user management, authorization, authentication, password resets, etc. check out the boilerplate and get coding the business side of your app sooner than later.
Types of Multitenancy
Speaking at a high level, there are two architectures to implement multitenancy:
- Single Database – Tenant Column Separation
- Multiple Database – Database per Tenant
The first approach, Single Database, uses one database for all tenants and implements a TenantId column to keep data separate. Having tables with mixed data might seem like madness when you first consider it, but this is actually the most common approach for achieving multitenancy. With the power of Entity Framework and global query filters, this approach works well and is actually not so complex to implement.
I recommend going the Single Database approach if your business requirements allow it. Granted, if you have legal requirements which dictate that customer data must be totally isolated, then a multi-database approach might be the only choice. Another possible reason you couldn’t use single database might be if your clients use external tools like Power BI that need to connect directly to a database. Allowing them access to a database that contains shared data will not be possible.
The second approach, Multiple Database, is where each tenant has their own database. In both approaches, the first step is to identify the tenants per each request. The database per tenant approach goes a step further by looking up the connection string for the tenant and using that when performing data access. With database per tenant the benefit is that each tenant has their data completely isolated.
While total data separation seems great at first, the added complexity arises when you need to create new tenants and when you need to perform schema updates (migrations). With new tenants, you will need to implement some automation with the infrastructure provider like Azure or AWS, to spin up a new database when you create a new tenant. The other issue is migrations, in that migrations will need to be performed on all the tenant databases whenever you apply new changes to the database.
Lastly, it should be noted that its possible to do a hybrid approach. A hybrid approach is where you store most of the tenants in the main database, and have isolated databases for tenants that require it. This may be beneficial if you have certain tenants that require more data isolation or higher performance requirements, but it does come with all the added complexities of the multiple database approach.
Building a Simple Multi-Tenant Application
In this tutorial, we are going to implement multi-tenancy with a Single Database with tenant isolation using a TenantId column. Most SaaS applications you’ve used in the real world, like CRMs, project management apps, PoS systems, etc. use single databases. The single database approach is easier to maintain and if we are going to actually enjoy our early retirement in Tahiti, easy maintenance is essential.
What we are going to build is a Web API, without any user interface, that contains the essential elements of a multi-tenant application.
At a high level, there are three main pieces of the puzzle that make multi-tenancy work.
- Tenant Identification per each request
- Ensuring all data is marked with a TenantId
- Filtering all requests by the TenantId
We will cover each of these points in this tutorial starting with identifying tenants per each request.
Tenant Identification Per Request
The first piece of the puzzle is identifying tenants per each request. Since middleware runs for every request, and is triggered before reaching any endpoints, its the perfect tool for plucking out a TenantId from incoming requests.
There are other ways you can present the TenantId in your requests but the two important ones are:
- Request Header
- Token/Cookie Claims
For simplicity, in this tutorial we will use Request headers to identify tenants for all of our requests, but in a real application, you would likely use request headers to identity tenants only on unauthenticated requests. You will want to use Token/Cookie claims for all authenticated requests thereafter. In other words, when a user is trying to login, that is the only time we would look for the tenant Id in the request header. Once they are issued a token/cookie, the tenantId would be contained in that token/cookie and sent up with every request as part of the authentication credentials.
It’s important to note that in this tutorial, we will not be implementing any authentication or authorization mechanisms. This tutorial is meant to demonstrate the basic concepts of multi-tenant architecture. Once ASP Identity is added into the mix, everything gets a bit more complex. The Nano ASP.NET Boilerplate however does implement authorization and authentication. It’s the perfect resource to have if you want to see how to secure a multi-tenant application.
Setting Up the Application
Let’s start coding something. We can begin by creating a Web API project. A Web API project only contains REST endpoints, and there’s nothing that resembles a UI – instead we will use Postman to interact with and test our multi-tenant app. Choose the latest .NET framework, which at the time of this writing is .NET 7, and choose None for authentication options.
The project we’re creating will contain one entity called Product, with one service called ProductService, and one controller called ProductsController. It’s really not even necessary to create a Product Service – we could instead just put all of our business logic in the Products Controller but using the service pattern with dependency injection is good practice. I’ve published other articles that explain interfaces and dependency injection.
The next steps will focus on setting up a basic application with CRUD functionality. Later we will transform this familiar single-tenant app into a multi-tenant one.
Add Entity Framework
We will begin by adding the necessary Nuget packages for Entity Framework. Right click on the project in the solution explorer and choose Manage Nuget Packages. There are three that we need to install:
- Entity Framework Core
- Entity Framework SqlServer
- Entity Framework Tools
Next, create a Models folder and create a class called ApplicationDbContext. This class should inherit from the DbContext class which is provided by the Entity Framework Core nuget package. Later, we will add a currentTenant service in the ApplicationDBContext. The code should look like this at this point.
public class ApplicationDbContext : DbContext
{

        // Constructor -- convention used by Entity Framework
        public ApplicationDbContext(DbContextOptions options) : base(options)
        {
        }

}
In the appsettings.json file, create an entry for connection strings and name it default connection like this:
  "ConnectionStrings": {
    "DefaultConnection": "Data Source=(localdb)\\mssqllocaldb;Database=multiTenantAppDb;Trusted_Connection=True;MultipleActiveResultSets=true"
  },
In program.cs add this line to add a database connection as a service to the application:
// adding a database service with configuration -- connection string read from appsettings.json
builder.Services.AddDbContext<ApplicationDbContext>(options => options.UseSqlServer(builder.Configuration.GetConnectionString("DefaultConnection")));
This is all standard code for any application that is configured to use a database with Entity Framework. Later we will scaffold an initial migration and create a database called multiTenantAppDb.
Create the IMustHaveTenant Interface
In the Models folder, create an interface named IMustHaveTenant with one property, TenantId as a string. This simple interface will serve as a marker for any entities we want to make tenant isolated. It will allow us to iterate over all tenant isolated entities in our application and guarantee that they all contain a TenantId property.
public interface IMustHaveTenant
{
    public string TenantId { get; set; }
}
Create the Product Entity
In the Models folder, create one entity named Product which implements the IMustHaveTenant interface. Make one of the fields a string property called TenantId. We will string IDs like ‘alpha’, ‘beta’, ‘gamma’ for tenants to make things easy to follow along. The Product class should look like this:
public class Product : IMustHaveTenant
{
    public int Id { get; set; }
    public string Name { get; set; }
    public decimal Price { get; set; }
    public string TenantId { get; set; }
}
Let’s remember to create a DbSet for our Product entity in the ApplicationDbContext like so:
public DbSet<Product> Products { get; set; }We will return to the ApplicationDbContext later but for now, let’s focus on setting up a working application.
Create the Tenant Entity
In the same Models folder, create another entity named Tenant with the following properties. There won’t be any relationship between this Tenant entity and any of the other entities in the application. Also, we won’t bother to create a service or a controller for managing tenants, as that’s not the focus of this tutorial. We will instead create them manually in the database. We are going to manually populate the primary keys with string values so add the following code with the data annotations for the ID property:
public class Tenant
{
    [Key]
    [DatabaseGenerated(DatabaseGeneratedOption.None)]
    public string Id { get; set; }
    public string Name { get; set; }
}
Create a DbSet for our Tenant entity in the ApplicationDbContext:
public DbSet<Tenant> Tenants { get; set; }Create the Product Service
Create a folder called Services in the top level of the application and within that folder, another folder called ProductService. Here we will create a class called ProductService and an interface called IProductService like this:
public interface IProductService
{
    IEnumerable<Product> GetAllProducts();
    Product GetProductById(int id);
    Product CreateProduct(CreateProductRequest request);
    bool DeleteProduct(int id);
}
Above is the interface, and below is the service that contains our business logic for managing Products
public class ProductService : IProductService
{
    private readonly ApplicationDbContext _context; // database context
    public ProductService(ApplicationDbContext context)
    {
        _context = context;
    }

    // get a list of all products
    public IEnumerable<Product> GetAllProducts()
    {
        var products = _context.Products.ToList();
        return products;
    }

    // get a single product
    public Product GetProductById(int id)
    {
        var product = _context.Products.Where(x => x.Id == id).FirstOrDefault();
        return product;
    }

    // create a new product
    public Product CreateProduct(CreateProductRequest request)
    {
        var product = new Product();
        product.Name = request.Name;
        product.Price = request.Price;

        _context.Add(product);
        _context.SaveChanges();

        return product;
    }


    // delete a product
    public bool DeleteProduct(int id)
    {
        var product = _context.Products.Where(x => x.Id == id).FirstOrDefault();

        if (product != null)
        {
            _context.Remove(product);
            _context.SaveChanges();
            return true;
        }
        return false;
    }
}
For the Create method, create a DTO (data transfer object) class for a new product request. In this case, I’ve named mine CreateProductRequest and placed it into a DTOs folder within the ProductService folder, like so:
    public class CreateProductRequest
    {
        public string Name { get; set; }
        public decimal Price { get; set; }
    }
Next, we will need to register the service in the top-level program.cs class as a transient service. We have already configured our database to use ApplicationDBContext with SqlServer and a connection string which is specified in appsettings.json. The program.cs class should look like this at this point:
using Microsoft.EntityFrameworkCore;
using queryFilterApp.Models;
using queryFilterApp.Services.ProductService;

var builder = WebApplication.CreateBuilder(args); // <--- 1. Create the Builder (ASP.NET convention)

// default services added when creating 'web api project' template
builder.Services.AddControllers();
builder.Services.AddEndpointsApiExplorer();

// adding a database service with configuration -- connection string read from appsettings.json
builder.Services.AddDbContext<ApplicationDbContext>(options => options.UseSqlServer(builder.Configuration.GetConnectionString("DefaultConnection")));

// adding our own service -- CRUD services should be registered with transient lifetimes
builder.Services.AddTransient<IProductService, ProductService>();


var app = builder.Build(); // <--- 2. Build the App (ASP.NET convention)


// default middleware when choosing create 'web api project'
app.UseHttpsRedirection();
app.UseAuthorization();
app.MapControllers();

app.Run(); // <--- 3. Run the App (ASP.NET convention)
Finally, we will create a Products controller with Get, Post, and Delete endpoints. The controller will inject an instance of the Product Service as is typically done in ASP.NET applications. Everything up to this point has been standard procedure in setting up a basic ASP.NET application, with the exception of creating a Tenant table. We should run the application to ensure things are working as expected, because in the next steps, we will make this multi-tenant.
    [Route("api/[controller]")]
    [ApiController]
    public class ProductsController : ControllerBase
    {
        private readonly IProductService _productService;

        public ProductsController(IProductService productService)
        {
            _productService = productService; // inject the products service
        }

        // Get list of products
        [HttpGet]
        public IActionResult Get()
        {
            var list = _productService.GetAllProducts();
            return Ok(list);
        }

        // Create a new product
        [HttpPost]
        public IActionResult Post(CreateProductRequest request)
        {
            var result = _productService.CreateProduct(request);
            return Ok(result);
        }

        // Delete a product by id
        [HttpDelete("{id}")]
        public IActionResult Delete(int id)
        {
            var result = _productService.DeleteProduct(id);
            return Ok(result);
        }

    }
Before we run the application we will need to create an initial migration and run the update-database command to actually create the database and tables. Note that if you are downloading the sample project on GitHub, the initial migration has already been created, and all you need to do is run the update-database command in the Package Manager Console.
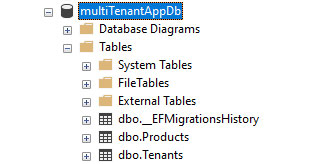
Inspect the Newly Created Database
Open up SQL Server Management Studio (SSMS) or the Database Explorer in visual studio to view the database. If everything has gone correctly, there should be new database called multiTenantAppDb with a Products table and a Tenants table.
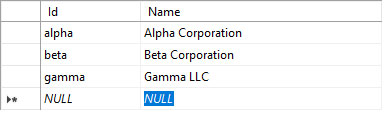
Create a few tenants in the tenants table. In a real multi-tenant application you would of course create a service and a controller with CRUD methods to manage tenants via the API. For the sake of time and simplicity, we will populate tenants manually. If you plan to build a multi-tenant application, the Nano ASP.NET Boilerplate has everything related to managing tenants and users with roles.
Create Tenant Resolver Middleware
Start by creating a new folder in the application called Middleware. Then create a class called TenantResolver. A class becomes middleware when it follows a particular signature. The middleware signature is defined by passing a RequestDelegate parameter in the constructor.
The code that runs is contained in the Task InvokeAsync method which follows, and in our case, this is how the code will look for our Tenant Resolver middleware:
    public class TenantResolver
    {
        private readonly RequestDelegate _next;
        public TenantResolver(RequestDelegate next)
        {
            _next = next;
        }

        // Get Tenant Id from incoming requests
        public async Task InvokeAsync(HttpContext context, ICurrentTenantService currentTenantService)
        {
            context.Request.Headers.TryGetValue("tenant", out var tenantFromHeader); // Tenant Id from incoming request header
            if (string.IsNullOrEmpty(tenantFromHeader) == false)
            {
                await currentTenantService.SetTenant(tenantFromHeader);
            }

            await _next(context);
        }


    }
The HttpContext object is an object that contains information about the incoming request, and it’s what we will use to read header values. The currentTenantService is a scoped service that we will create in the next step, which will be responsible for looking up the tenant in the database to verify they exist. It will also hold onto the tenantId value throughout the request lifecycle.
In the code above, we use the TryGetValue method to see if the request contains a header called tenant, and if it does, we read that value and attempt to set it in the currentTenantService.
If you were building a secure application with authentication, it would be important to read tenant values from the cookie/JWT token first before attempting to read from the header.
Create a Current Tenant Service
The next item on the agenda is to create a CurrentTenantService class and an ICurrentTenantService interface. This is the service that the tenant resolver middleware will rely on to verify the tenant exists in the database and store the current tenant values. It will be invoked on every request. Since the tenant value will need to remain available throughout the entirety of the request lifecycle, this service should be registered with a Scoped lifetime.
In the services folder, create a service called CurrentTenantService. Here is what the code should look like:
public class CurrentTenantService : ICurrentTenantService
    {
        private readonly TenantDbContext _context;
        public string? TenantId { get; set; }

        public CurrentTenantService(TenantDbContext context)
        {
            _context = context;

        }
        public async Task<bool> SetTenant(string tenant)
        {

            var tenantInfo = await _context.Tenants.Where(x => x.Id == tenant).FirstOrDefaultAsync(); // check if tenant exists
            if (tenantInfo != null)
            {
                TenantId = tenant;
                return true;
            }
            else
            {
                throw new Exception("Tenant invalid");
            }

        }
    }
And here is how the interface should look:
    public interface ICurrentTenantService
    {
        string? TenantId { get; set; }
        public Task<bool> SetTenant(string tenant);
    }
The service has one method, which takes a string value – the tenant key, and looks this up in the database to verify that the tenant exists. In a real world application, you would probably check if the tenant has a valid subscription, what their membership level is, etc. If the tenant exists, the value is stored as the TenantId property which remains available throughout the request lifecycle anywhere else in the application – most importantly, in the ApplicationDbContext.
As we will see in the next steps, this service is invoked in the ApplicationDbContext and the TenantId property will be read every time something is saved in the database. Now, considering that the CurrentTenantService needs a context class to look up tenants in the database, and the ApplicationDbContext will invoke the CurrentTenantService every time it’s constructed, we will get a circular logic error if we try to use ApplicationDbContext in the CurrentTenantService.
Take a closer look at the code for the CurrentTenantService and you will notice that we are using a separate context called TenantDbContext to access the database. By creating a separate context for looking up tenants at the start of the request, we’ll avoid circular logic errors. This by the way, is rarely explained in other tutorials on building multi-tenant apps because most of them don’t show you how to store tenant information in a database. Since we definitely want to store tenant information in a database and not in something like a JSON file, let’s create the TenantDbContext.
Create a TenantDbContext
We’ll need to create a separate context class for looking up tenant info as the requests come in. This context class will only contain one DbSet, Tenants, and will not invoke any services in its constructor. So in other words, its a very basic context! Here’s how the code should look:
  public class TenantDbContext : DbContext
    {
        // This context is for looking up the tenant when a request comes in.
        public TenantDbContext(DbContextOptions<TenantDbContext> options)
        : base(options)
        {
        }

        public DbSet<Tenant> Tenants { get; set; }

    }
Now that our project contains multiple context classes, we will need to take some extra steps when running migrations and applying database changes. When you run the add-migration or update-database commands in Package Manager Console, you’ll need to specify which context to use. Just write -Context ApplicationDbContext after the commands like this:
add-migration -Context ApplicationDbContext
update-database -Context ApplicationDbContext
TenantDbContext will not be used for migrations, for migrations we’ll use the main context, ApplicationDbContext. When adding new entities, you should only add the DbSets to ApplicationDbContext – TenantDbContext only needs to be aware of the Tenants table.
Modify ApplicationDbContext Save Changes Override
At this point, we have completed the first piece of the puzzle in building a multi-tenant application. For every incoming request, our middleware is reading a tenant value from the request header and storing that value in our CurrentTenantService.
The place we need to use that current TenantId is in the ApplicationDbContext. When we are saving entities, we will write that value to the entity being saved if the entity is of type IMustHaveTenant. This is the second piece of the puzzle and it looks like this:
public class ApplicationDbContext : DbContext
    {
        private readonly ICurrentTenantService _currentTenantService;
        public string CurrentTenantId { get; set; }

        // Constructor
        public ApplicationDbContext(ICurrentTenantService currentTenantService, DbContextOptions<ApplicationDbContext> options) : base(options)
        {
            _currentTenantService = currentTenantService;
            CurrentTenantId = _currentTenantService.TenantId;
        }

        // DbSets -- create for all entity types to be managed with EF
        public DbSet<Product> Products { get; set; }
        public DbSet<Tenant> Tenants { get; set; }

        // On Save Changes - write tenant Id to table
        public override int SaveChanges()
        {
            foreach (var entry in ChangeTracker.Entries<IMustHaveTenant>().ToList())
            {
                switch (entry.State)
                {
                    case EntityState.Added:
                    case EntityState.Modified:
                        entry.Entity.TenantId = CurrentTenantId;
                        break;
                }
            }
            var result = base.SaveChanges();
            return result;
        }
    }
The first important change is to instantiate the CurrentTenantService in the constructor of ApplicationDbContext. We will also read the TenantId property of that service in the constructor, and store it as a local value in ApplicationDbContext.
Next, we will add an override to the SaveChanges method. The code here is checking for any entities that are of type IMustHaveTenant, and writing the current TenantId value for those entities whenever they are saved or modified.
Using a marker interface like IMustHaveTenant is especially useful in a case like this because all we have to do is implement that interface on any entity we want to be tenant isolated. You could have some entities that are not tenant isolated like static data (country lists for example) and these entities will not be subjected to any on save changes automation.
Now all will need to do is add a Where clause like x=>x.TenantId == currentTenantService.TenantId anywhere we have a Get request, right? We’ll also need to instantiate the currentTenantService in every controller with a get statement, right? Thankfully no, that would be extremely uncool and repetitive. The answer is that there is a better way called global query filtering, which we will implement next.
Add a Global Query Filter to ApplicationDbContext
For the final piece of the puzzle, we want to filter every query whenever we read data. At this point, we can guarantee that any entity of type IMustHaveTenant will have a TenantId column with a value of the tenant that created it.
In order to avoid the repetitive madness of adding Where clauses everywhere, we will add an OnModelCreating override method in ApplicationDbContext and use a Query Filter. The final rendition of the ApplicationDbContext code should look as follows:
public class ApplicationDbContext : DbContext
    {
        private readonly ICurrentTenantService _currentTenantService;
        public string CurrentTenantId { get; set; }

        // Constructor
        public ApplicationDbContext(ICurrentTenantService currentTenantService, DbContextOptions<ApplicationDbContext> options) : base(options)
        {
            _currentTenantService = currentTenantService;
            CurrentTenantId = _currentTenantService.TenantId;
        }

        // DbSets -- create for all entity types to be managed with EF
        public DbSet<Product> Products { get; set; }
        public DbSet<Tenant> Tenants { get; set; }

        // On Model Creating - multitenancy query filters
        protected override void OnModelCreating(ModelBuilder builder)
        {
            builder.Entity<Product>().HasQueryFilter(a => a.TenantId == CurrentTenantId);
        }

        // On Save Changes - write tenant Id to table
        public override int SaveChanges()
        {
            foreach (var entry in ChangeTracker.Entries<IMustHaveTenant>().ToList())
            {
                switch (entry.State)
                {
                    case EntityState.Added:
                    case EntityState.Modified:
                        entry.Entity.TenantId = CurrentTenantId;
                        break;
                }
            }
            var result = base.SaveChanges();
            return result;
        }
    }
The OnModelCreating method fires only once, at the time of the application launch. While the model itself is static, the value of CurrentTenantId will remain dynamic. In other words, anytime a query is performed, the value of CurrentTenantId will be of the current request.
Just like that, we have implemented the third and final piece of the puzzle. You now have a multitenant application. Whenever you add new entities, you’ll need to implement the IMustHaveTenant interface on them to make them tenant isolated. You’ll also have to add another query filter in the OnModelCreating model because you cannot specify an interface type here.
You could create a fancy extension method to automate the process of adding query filters based on interface type, but that is outside of the scope of this tutorial. Check out the Nano ASP.NET Boilerplate though if that sounds interesting. The Nano ASP.NET Boilerplate contains an extension method to query filters based on interface type as well as many other useful methods.
At this point the application is complete and we can move on to testing what we’ve created.
Testing the Multi-Tenant Capabilities of the Application
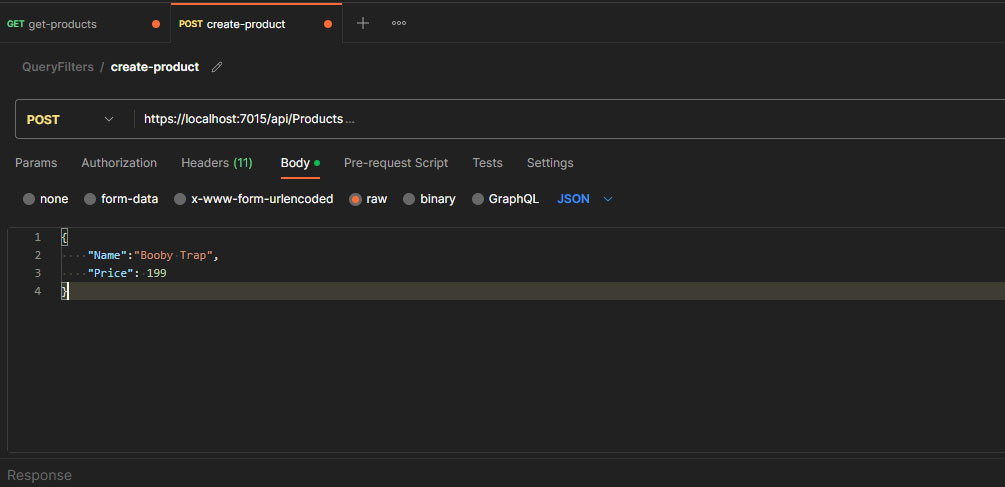
Open up Postman or whatever tool you wish to use for testing and start by creating a few Products. In the Headers section of the request, create a header called tenant and populate the value with one of the tenantIds you created earlier. Here I will create a few products as the beta tenant:
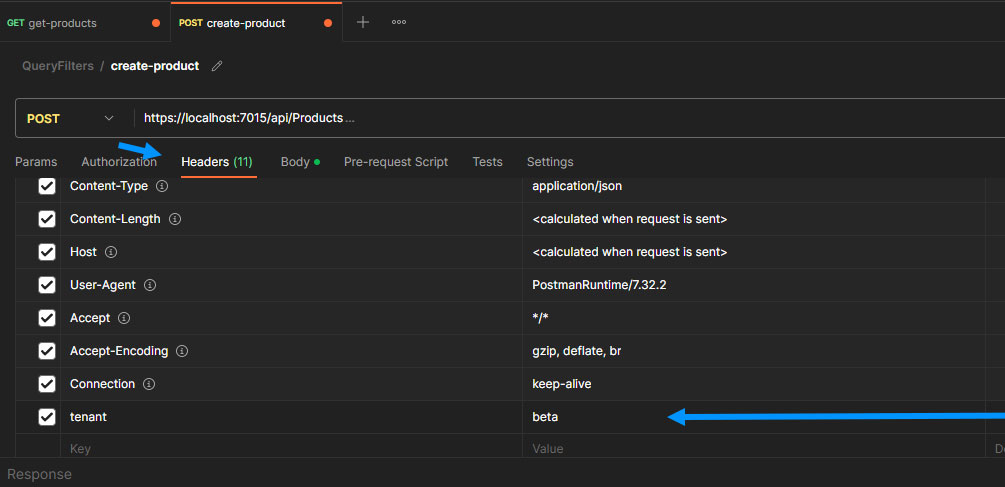
Above, the header value and below, the Post body:
After you create a few products for each tenant, the database Products table will look like this
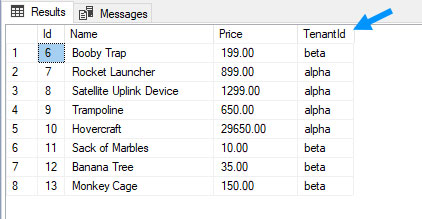
The TenantId field should be populated with the values of the tenant that created them. Now when we go to retrieve the list of products with a Get request, only the products that belong to the specified tenant should be returned. Create a tenant header value, just like we did for the Post request when we created the products, and send the Get request.
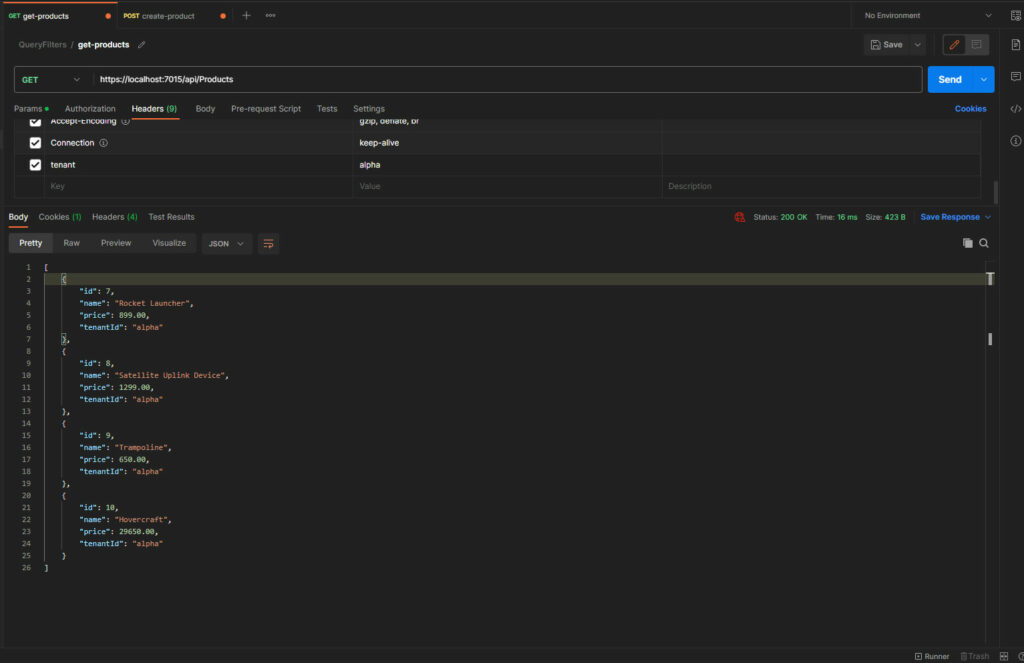
Above, sending the Get request for the alpha tenant. Below, sending the get request for the beta tenant:
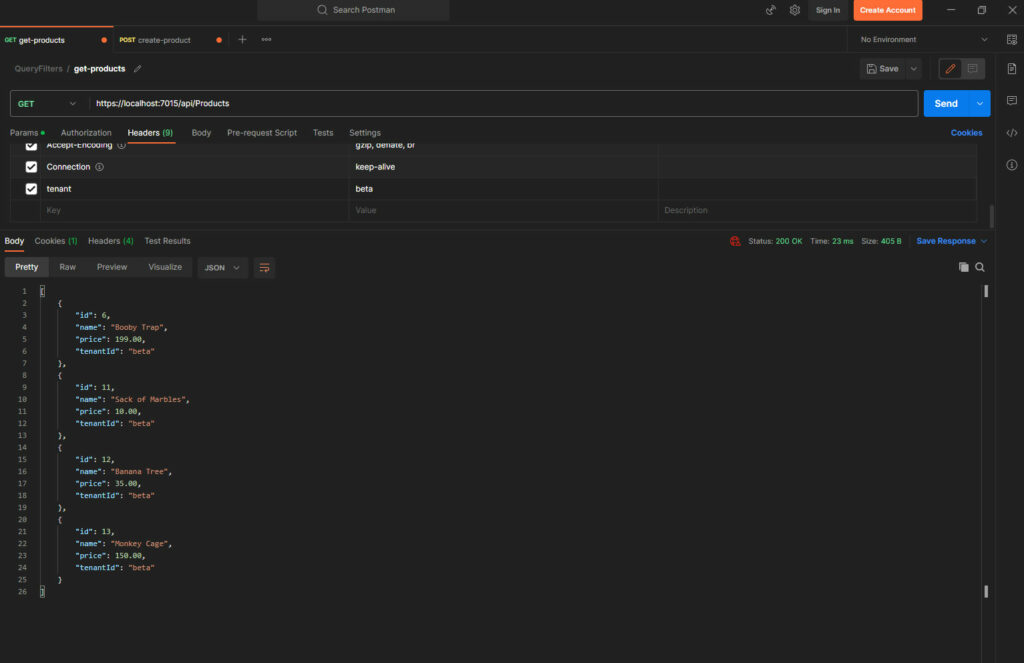
You should see tenant specific lists of products if everything is working properly. So, if you’ve made it this far congratulations, because you now understand the fundamentals of creating a multi-tenant application with ASP.NET and Entity Framework Core. You have a big step towards building your SaaS app and living the easy life in Tahiti.
If you found this article helpful and want to take it to the next level, you could try to implement authorization and authentication to make it a secure multi-tenant application. As it is now, anyone can change the request header. When you use something like ASP Identity to issue tamper-proof cookies or tokens, you would store the tenant value within those and can reliably validate which tenant is making the request.
In Part 2 of this tutorial series, we will extend this solution to support hybrid and multiple tenant databases.
Please consider buying the Nano ASP.NET SaaS boilerplate to kickstart your next multi-tenant project! You will be supporting this blog and saving yourself a lot of time, even if its just to use as a learning resource. Good luck on whatever path you choose.
