


Setup
This guide focuses on getting the .NET solution up and running. Continue with Solution Overview and the rest of the .NET guides for a deep dive into the code and structure.
Getting Started
In the zip download find the folder called dotnet. Extract this folder to a location on your computer and open the AspNano solution file (.sln). The full version of the AspNano solution contains a Razor pages project in addition to what you see here.
The Vue / React projects are standalone projects and share nothing with the .NET solution. They should be managed separately with their own source control.
Specify the Connection String
Expand the WebApi project and open appsettings.json. Under ConnectionStrings “DefaultConnection” edit the string as needed to point to your local SQL Server instance. You can give the database a new name or leave it as AspNanoDb.
"ConnectionStrings": {
    "DefaultConnection": "Data Source=(localdb)\\mssqllocaldb;Database=AspNanoDb;Trusted_Connection=True;MultipleActiveResultSets=true"
  },
If you are working with Razor pages, use appsettings.json in the RazorApp project.
Run the Application
When the application is run, any pending migrations are automatically applied. The boilerplate has initial migrations already created. To begin, just run the application. Entity Framework will create a database and seed it with a root tenant and root user with the following credentials:
User: admin@email.com
Password: Password123!
The application will run at:
https://localhost:7250/
When you navigate to the localhost:7250 address, you will notice that a client is already running. The client instance you see here is actually being served from the static files found within the wwwroot folder of the AspNano.WebApi project. This is the ‘build’ version of the Vue / React client. When you work with a client project, it will run the ‘development’ version on a different port (localhost:3000).
To run the Razor pages project, select RazorApp as the default startup project. The application will run at:
https://localhost:7251/To learn about the .NET Web API project, start with the Solution Overview documentation.
Explicitly Run Migrations (Optional)
Migrations are found in the Infrastructure class library, in persistence/migrations there are two folders: BaseDB and AppDB. Each contain an initial migration. These migrations, like any pending migrations, are applied automatically when the app is run.
If you want to explicitly run migrations, you can with the update-database command in Package Manager Console. In Package Manager Console, change the default project to Infrastructure. If you are using VS code, you can do this via command line.
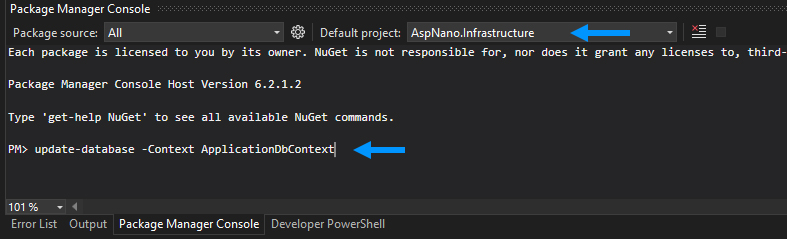
Next, run the following commands:
update-database -Context BaseDbContext

update-database -Context ApplicationDbContext
Because there are multiple contexts BaseDbContext , ApplicationDbContext and TenantDbContext, a switch must be provided with the update-database command. The -Context switch tells Entity Framework which context to use for migrations. Read the Multi-Tenancy and Persistence & Infrastructure guides to learn more about DB contexts.
Next Steps
Check out the next guide Solution Overview for a top down look at the .NET solution.